
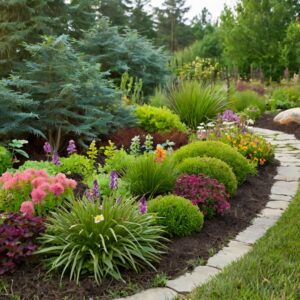
Berms, those elegant mounds of earth that add depth and dimension to landscapes, are more than just aesthetic features. They serve multiple functional purposes, such as improving drainage, creating privacy, and reducing noise. Understanding the essential principles of berm design, from their shape and height to their slope, is crucial for any homeowner or landscaper aiming to enhance their yard. This article delves into these principles, offers guidance on selecting the ideal location for a berm, and provides tips on integrating berms into both small and large landscapes for maximum effect.
Essential Principles of Berm Design :
Shape :
The shape of a berm is foundational to its effectiveness and visual appeal. While berms can be constructed in various forms, the most common shapes are crescent, oval, and freeform. Each shape serves different purposes and aesthetics:
1. Crescent Shape: This shape is often used to frame a focal point, such as a tree or a statue, adding a gentle, natural-looking rise and fall to the landscape.
2. Oval Shape: Ovals provide a smooth, continuous look that can encircle a garden bed or a seating area, creating a unified and cohesive appearance.
3. Freeform: These irregular shapes mimic natural land formations and are ideal for creating a more organic feel in the yard.
Height :
The height of a berm should be carefully considered to balance functionality with aesthetics. Generally, berm heights range from 18 inches to 4 feet. Several factors influence the optimal height:
1. Purpose: For privacy or noise reduction, taller berms are preferred. However, for decorative purposes or subtle elevation changes, shorter berms suffice.
2. Proportion: The height of the berm should be in proportion to the overall landscape. A berm that is too tall may appear unnatural and out of place, while a too-short berm may not achieve the desired effect.
3. Planting: Taller berms allow for tiered planting, which can create a layered and textured look, while shorter berms are suitable for ground cover and low-growing plants.
Slope :
The slope of a berm is critical for stability and maintenance. A gentle slope, ideally between 4:1 and 5:1 (horizontal to vertical ratio), ensures that the berm remains stable and easy to mow. Steeper slopes may be used for specific design effects but require more maintenance and erosion control measures. Key considerations for slope include:
1. Erosion Control: Gentle slopes minimize erosion, especially when combined with appropriate planting and mulching.
2. Accessibility: Slopes should be gentle enough to allow for easy maintenance, whether it involves mowing, planting, or watering.
3. Aesthetics: Gradual slopes create a more natural and pleasing look, blending seamlessly with the existing landscape.
Choosing the Right Location for a Berm :
Selecting the ideal location for a berm involves a thorough analysis of the yard’s topography, drainage patterns, and intended use. Here are essential steps to guide this decision:
1. Assess Topography: Identify the natural high and low points in the yard. Berms can be used to accentuate these features or to fill in and smooth out uneven areas.
2. Evaluate Drainage: Berms can direct water flow away from structures and low-lying areas prone to flooding. Place berms strategically to improve drainage and prevent water pooling.
3. Determine Purpose: Clarify the primary function of the berm. Is it for privacy, noise reduction, visual interest, or improving drainage? The intended use will significantly influence the best location.
4. Consider Sunlight: Evaluate the sun exposure in different parts of the yard. Berms can create microclimates, providing shade for shade-loving plants or elevating sun-loving plants to catch more light.
5. Visual Impact: Position berms to enhance the overall landscape design. They can serve as focal points, frame views, or provide a backdrop for other garden elements.
Incorporating Berms into Small and Large Landscapes :
Small Landscapes
In small yards, berms should be used judiciously to avoid overwhelming the space. Here are some tips:
1. Scale Appropriately: Keep berms low and subtle. Heights between 1 to 2 feet are generally sufficient.
2. Maximize Planting Space: Use berms to create additional planting areas, particularly for perennials and small shrubs that add color and texture.
3. Create Visual Interest: Incorporate curves and undulations to break up flat expanses and lead the eye through the garden.
4. Combine with Hardscaping: Integrate berms with pathways, rock gardens, and seating areas to create a cohesive and multifunctional outdoor space.
Large Landscapes :
In larger yards, berms can be more dramatic and serve multiple purposes:
1. Create Zones: Use berms to define different areas, such as separating a play area from a garden or creating distinct outdoor rooms.
2. Enhance Privacy and Noise Reduction: Taller, strategically placed berms can block views of neighboring properties and reduce noise from roads.
3. Improve Drainage: Large berms can redirect water flow and prevent erosion in expansive landscapes.
4. Showcase Specimen Plants: Elevate specimen trees or shrubs on berms to highlight their beauty and create focal points.
5. Layer Plantings: Use the height and slope of berms to create tiered planting beds, showcasing a variety of plant heights and textures for a lush, dynamic look.
Practical Tips for Berm Construction :
1. Soil Quality: Use good quality topsoil mixed with compost for the top layer of the berm. Ensure the soil is well-draining to prevent waterlogging.
2. Base Material: Start with a base of fill material, such as gravel or sand, to provide stability and prevent settling.
3. Shape Gradually: Build up the berm gradually, layering soil and shaping it as you go to achieve the desired height and slope.
4. Planting: Choose a mix of plants that suit the berm’s microclimate. Consider drought-tolerant plants for the top and moisture-loving plants for the base.
5. Maintenance: Mulch the berm to retain moisture and prevent weeds. Regularly check for erosion and repair any damage promptly.